Introduction
Network Addresses and DNS
Introduction to Networking
IP Addresses
IPv4 and IPv6
IPv4 Address Types
Reserved Addresses
Decoding IPv4 Addresses
Class A Network Addresses
Class B Network Addresses
Class C Network Addresses
Net masks
IPv6 Address Types
IP Address Allocation
Name Resolution
Using dig
Getting and Setting the Hostname
DNS
Networking Problem Troubleshooting
Networking Configuration and Tools
Network Configuration Files
Network Interfaces
The ip Utility
ping
route
mtr
traceroute
More Networking Tools
Network Time Protocol
NTP Applications
Configuring the ntpd Client
Configuring the ntpd Server
Access Control
Peer Configuration
Declaring Self a Time Source
Browsers, wget and curl
wget
curl
Transferring Files
FTP (File Transfer Protocol)
FTP Clients
SSH: Executing Commands Remotely
Copying Files Securely with scp
SSH
ssh Configuration Files
SSH Configuration File Precedence
SSH on a Cloud System
NETWORK DEVICES AND CONFIGURATION
Network Devices
Predictable Network Interface Device Names
Network Configuration Files
Network Manager Configuration Files
Network Manager
Network Manager Interfaces
nmtui
nmcli
Routing
Default Route
Static Routes
Teaming and Bonding Network Interfaces
Bonding Network Interfaces
Creating Bonding Network Interface with nmcli
/etc/hosts
LDAP (Lightweight Directory Access Protocol)
LDAP Authentication
LDAP Authentication
LDAP and sssd packages
Firewalls
What Is a Firewall?
Packet Filtering
Firewall Generations
Firewall Interfaces and Tools
firewalld and firewall-cmd
firewalld Service Status
Zones
Zone Management Examples
Source Management
Service Management
Port Management
Port Redirection and NAT
Network Address Translation (NAT)
DNAT (Destination Network Address Translation)
SNAT and Masquerade
Knowledge Check (Verified Certificate track only)
Summary
Introduction
- Explain basic networking concepts, including types of networks and addressing issues.
- Configure network interfaces and use basic networking utilities, such as
**ifconfig**,**ip**,**ping**,**route**and**traceroute**. - Use graphical and non-graphical browsers, such as Lynx, w3m, Firefox, Chrome and Epiphany.
- Transfer files to and from clients and servers using both graphical and text mode applications, such as Filezilla, ftp, sftp, curl and wget.
Network Addresses and DNS
==Introduction to Networking==
- A network is a group of computers and computing devices connected together through communication channels, such as cables or wireless media.
- The computers connected over a network may be located in the same geographical area or spread across the world.
- A network is used to:
- Allow the connected devices to communicate with each other
- Enable multiple users to share devices over the network, such as music and video servers, printers and scanners.
- Share and manage information across computers easily.
- Most organizations have both an internal network and an Internet connection for users to communicate with machines and people outside the organization. The Internet is the largest network in the world and can be called “the network of networks”.
==IP Addresses==
- Devices attached to a network must have at least one unique network address identifier known as the IP (Internet Protocol) address. The address is essential for routing packets of information through the network.
- IP addresses are used to uniquely identify nodes across the internet. They are assigned through RIRs (Regional Internet Registries).
- Exchanging information across the network requires using streams of small packets, each of which contains a piece of the information going from one machine to another. These packets contain data buffers, together with headers which contain information about where the packet is going to and coming from, and where it fits in the sequence of packets that constitute the stream.
![[/Untitled 89.png|Untitled 89.png]]
==IPv4 and IPv6==
- There are two different types of IP addresses available: IPv4 (version 4) and IPv6 (version 6).
- IPv4 is older and by far the more widely used, while IPv6 is newer and is designed to get past limitations inherent in the older standard and furnish many more possible addresses.
- ==IPv4== uses ==32-bits== for addresses; there are only 4.3 billion unique addresses available. Furthermore, many addresses are allotted and reserved, but not actually used.
- IPv4 is considered inadequate for meeting future needs because the number of devices available on the global network has increased enormously in recent years.
- ==IPv6== uses ==128-bits== for addresses; this allows for 3.4 X 1038 unique addresses. If you have a larger network of computers and want to add more, you may want to move to IPv6, because it provides more unique addresses.
- However, it can be complex to migrate to IPv6; the two protocols do not always inter-operate well. Thus, moving equipment and addresses to IPv6 requires significant effort and has not been quite as fast as was originally intended.
![[/Untitled 1 51.png|Untitled 1 51.png]]
- One reason IPv4 has not disappeared is there are ways to effectively make many more addresses available by methods such as NAT (Network Address Translation).
- NAT enables sharing one IP address among many locally connected computers, each of which has a unique address only seen on the local network. While this is used in organizational settings, it also used in simple home networks.
- For example, if you have a router hooked up to your Internet Provider (such as a cable system) it gives you one externally visible address, but issues each device in your home an individual local address.
IPv4 Address Types
-
==Close Unicast==
An address associated with a specific host. It might be something like 140.211.169.4 or 64.254.248.193.
-
==Close Network==
An address whose host portion is set to all binary zeroes. Ex. 192.168.1.0. (the host portion can be the last 1-3 octets ; here it is just the last octet).
-
==Close Broadcast==
An address to which each member of a particular network will listen. It will have the host portion set to all 1 bits, such as in 172.16.255.255 or 148.114.255.255 or 192.168.1.255. (the host portion is the last two octets in the first two cases, just the last one in the third case).
-
==Close Multticast==
An address to which appropriately configured nodes will listen. The address 224.0.0.2 is an example of a multicast address. Only nodes specifically configured to pay attention to a specific multicast address will interpret packets for that multicast group.
Reserved Addresses
Reserved IP addresses
In the Internet addressing architecture, the Internet Engineering Task Force (IETF) and the Internet Assigned Numbers Authority (IANA) have reserved various Internet Protocol (IP) addresses for special purposes.
https://en.wikipedia.org/wiki/Reserved_IP_addresses
Certain addresses and address ranges are reserved for special purposes.
Examples of Reserved Addresses
-
==Close 127.x.x.x==
Reserved for the loopback (local system) interface, where 0 <= x <= 254. Generally, 127.0.0.1.
-
==Close 0.0.0.0==
Used by systems that do not yet know their own address. Protocols like DHCP and BOOTP use this address when attempting to communicate with a server.
-
==Close 255.255.255.255==
Generic broadcast private address, reserved for internal use. These addresses are never assigned or registered to anyone. They are generally not routable.
-
==Close Other reserved addresses==
Other examples of reserved address ranges include:
-
10.0.0.0 - 10.255.255.255
-
172.16.0.0 - 172.31.255.255
-
192.168.0.0 - 192.168.255.255
-
Etc.
Each of these has a purpose. For example, the familiar address range, 192.168.x.x is used only for local communications within a private network.
-
==Decoding IPv4 Addresses==
-
A 32-bit IPv4 address is divided into four 8-bit sections called octets.
-
Network addresses are divided into five classes: A, B, C, D and E.
-
==Classes A, B and C== are classified into two parts:
==Network addresses (Net ID==) and
==Host address (Host ID)==.
-
The ==Net ID== is used to identify the network, while
-
the ==Host ID== is used to identify a host in the network.
-
==Class D== is used for special multicast applications (information is broadcast to multiple computers simultaneously) and ==Class E== is reserved for future use.
![[/Untitled 2 39.png|Untitled 2 39.png]]
![[/Untitled 3 27.png|Untitled 3 27.png]]
![[/Untitled 4 22.png|Untitled 4 22.png]]
| NETWORK CLASS | HIGHEST ORDER OCTET RANGE | NOTES |
|---|---|---|
| A | 1-127 | 128 networks, 16,772,214 hosts per network, 127.x.x.x reserved for loopback |
| B | 128-191 | 16,384 networks, 65,534 hosts per network |
| C | 192-223 | 2,097,152 networks, 254 hosts per network |
| D | 224-239 | Multicast addresses |
| E | 240-254 | Reserved address range |
==Class A Network Addresses==
- Class A addresses use the first octet of an IP address as their ==Net ID== and use the other three octets as the ==Host ID==****.
- The first bit of the first octet is always set to zero. So you can use only 7-bits for unique network numbers.
- As a result, there are a maximum of 126 Class A networks available (the addresses 0000000 and 1111111 are reserved).
- Each Class A network can have up to 16.7 million unique hosts on its network. The range of host address is from ==1.0.0.0== ==to== ==127.255.255.255==.
![[/Untitled 5 19.png|Untitled 5 19.png]]
- NOTE__: The value of an octet, or 8-bits, can range from 0 to 255.
==Class B Network Addresses==
- Class B addresses use the first two octets of the IP address as their ==Net ID== and the last two octets as the ==Host ID==.
- The first two bits of the first octet are always set to binary 10, so there are a maximum of 16,384 (14-bits) Class B networks.
- The first octet of a Class B address has values from 128 to 191.
- The introduction of Class B networks expanded the number of networks but it soon became clear that a further level would be needed.
- Each Class B network can support a maximum of 65,536 unique hosts on its network. The range of host addresses is from ==128.0.0.0== ==to== ==191.255.255.255==.
![[/Untitled 6 16.png|Untitled 6 16.png]]
==Class C Network Addresses==
- Class C addresses use the first three octets of the IP address as their ==Net ID== and the last octet as their ==Host ID==.
- The first three bits of the first octet are set to binary 110, so almost 2.1 million (21-bits) Class C networks are available.
- The first octet of a Class C address has values from 192 to 223. These are most common for smaller networks which don’t have many unique hosts.
- Each Class C network can support up to 256 (8-bits) unique hosts. The range of host addresses is from ==192.0.0.0== ==to== ==223.255.255.255==.
![[/Untitled 7 12.png|Untitled 7 12.png]]
==Net masks==
**netmask** is used to determine how much of the address is used for the network portion and how much for the host portion as we have seen. It is also used to determine network and broadcast addresses.
- Class A addresses use 8 bits for the network portion of the address and 24 bits for the host portion of the address
- Class B addresses use 16 bits for the network and 16 bits for the host
- Class C addresses use 24 bits for the network and 8 bits for the host
- Class D addresses are used for multicasting
- Class E addresses are currently not used
| NETWORK CLASS | DECIMAL | HEX | BINARY |
|---|---|---|---|
| A | 255.0.0.0 | ff:00:00:00 | 11111111 00000000 00000000 00000000 |
| B | 255.255.0.0 | ff:ff:00:00 | 11111111 11111111 00000000 00000000 |
| C | 255.255.255.0 | ff:ff:ff:00 | 11111111 11111111 11111111 00000000 |
We can calculate the network address by **anding** (logical and - &) the IP address with the netmask. We are interested in the network addresses because they define a local network which consists of a collection of nodes connected via the same media and sharing the same network address. All nodes on the same network can directly see each other.
Example:
  172.16.2.17 ip address
& 255.255.0.0 netmask
-----------------------------
  172.16.0.0 network address
IPv6 Address Types
-
==Close Unicast==
A packet is delivered to one interface.
- Link-local: Auto-configured for every interface to have one. Non-routable.
- Global: Dynamically or manually assigned. Routable.
- Reserved for documentation.
-
==Close Multicast==
A packet is delivered to multiple interfaces.
-
==Close Anycast==
A packet is delivered to the nearest of multiple interfaces (in terms of routing distance).
-
==Close IPv4-Mapped==
An IPv4 address mapped to IPv6. For example, ::FFFF:a.b.c.d/96
==IP Address Allocation==
- Typically, a range of IP addresses are requested from your Internet Service Provider (ISP) by your organization’s network administrator.
- IP address you are given depends on the size of your network and expected growth needs.
- If NAT (Network Address Translation) is in operation, such as in a home network, you only get one externally visible address!
- You can assign IP addresses to computers over a network either manually or dynamically.
- Manual assignment adds static (never changing) addresses to the network.
- Dynamically assigned addresses can change every time you reboot or even more often; the ==D==ynamic ==H==ost ==C==onfiguration ==P==rotocol (==DHCP==) is used to assign IP addresses.
![[/Untitled 8 10.png|Untitled 8 10.png]]
==Name Resolution==
-
Name Resolution is used to convert numerical IP address values into a human-readable format known as the hostname. For example,
**104.95.85.15**
is the numerical IP address that refers to the hostnamewhitehouse.gov. -
There are several command line tools that can be used to resolve the IP address of a hostname:
[dig | host | nslookup] linuxfoundation.org -
d``**ig**: generates the most information and has many options -
**host**: more compact -
**nslookup**: older and not recommended; can have wrong answers, especially with DNSSEC.
**dig** is the newest and the others are sometimes considered deprecated, but the output for host is the easiest to read and contains the basic information.
One sometimes also requires reverse resolution: converting an IP address to a host name.
Using **dig**
The **dig** utility gives the most correct answer among shipped tools.
- Default output is often too verbose for simple tasks or scripting
- Can view entire resolution chain
- Can view and verify DNSSEC operation
Some useful options:
**+trace**Check the entire path, from the root servers (by default)**t [record type]**specify the record (including**A**,**TXT**,**CNAME**,**MX**)
Here is an example of using dig with the default address lookup behavior:
dig linuxfoundation.org
; <<>> DiG 9.16.27-Debian <<>> linuxfoundation.org
;; global options: +cmd
;; Got answer:
;; ->>HEADER<<- opcode: QUERY, status: NOERROR, id: 54765
;; flags: qr rd ra; QUERY: 1, ANSWER: 1, AUTHORITY: 0, ADDITIONAL: 1

;; OPT PSEUDOSECTION:
; EDNS: version: 0, flags:; udp: 4096
;; QUESTION SECTION:
;linuxfoundation.org.       IN            A

;; ANSWER SECTION:
linuxfoundation.org.    524    IN    A      3.13.31.214

;; Query time: 3 msec
;; SERVER: 10.139.1.1\#53(10.139.1.1)
;; WHEN: Sun May 07 13:40:00 EDT 2023
;; MSG SIZE rcvd: 64
This is showing a lookup for an A record (IPv4), flags, transport, and timing information.
Let’s try with reverse resolution and make it much less verbose:
dig -x 1.1.1.1 +short
one.one.one.one.==Getting and Setting the Hostname==
- You can view your system’s hostname simply by typing
**hostname**with no argument. - The special hostname localhost is associated with the IP address
**127.0.0.1**and describes the machine you are currently on (which normally has additional network-related IP addresses). - This can be done in either a static fashion using the
**/etc/hosts**file, or dynamically using DNS servers. - The hostname is simply a label to distinguish a networked device from other nodes. Historically, this has also been called a nodename.
- For DNS purposes, hostnames are appended with a period (dot) and a domain name, so that a machine with a hostname of antje could have a fully qualified domain name (FQDN) of
**antje.linuxfoundation.org**. - The hostname is generally specified at installation time, but can be changed at any time later.
- Any user can get the hostname with (command and output below):
hostname
fedora

\#Changing hostname requires root privilege (command and output below):
sudo hostname KDE
KDE
The current value is always stored in **/etc/hostname** on most Linux distributions. To do this persistently so changes survive a reboot use the **hostnamectl** command, part of the systemd infrastructure:
sudo hostnamectl set-hostname KDEHistorically, making persistent changes involved changing configuration files in the **etc** directory tree. On Red Hat-based systems this was **/etc/sysconfig/network**, on Debian-based systems this was **/etc/hostname** and on SUSE-based systems it was **/etc/HOSTNAME**.However, one should use the **hostnamectl** command on modern systems:
hostnamectl
Static hostname: c8
         Icon name: computer-desktop
           Chassis: desktop
        Machine ID: ce0c82382a8a4c80bbd6931a917a2f1c
           Boot ID: 94207b3fbd9b4891b9a94e21762a47cb
  Operating System: Red Hat Enterprise Linux 8.2 (Ootpa) \
           dracut-049-70.git20200228.el8 (Initramfs)
            Kernel: Linux 5.11.6
      Architecture: x86-64

\#To see a usage message, type the following command:

hostnamectl --help
hostnamectl [OPTIONS...] COMMAND ...
Query or change system hostname
-h --help              Show this help
   --version           Show package version
   --no-ask-password   Do not prompt for password
-H --host=[USER@]HOST  Operate on remote host
-M --machine=CONTAINER Operate on local container
   --transient         Only set transient hostname
   --static            Only set static hostname
   --pretty            Only set pretty hostname

Commands:
  status               Show current hostname settings
  set-hostname NAME    Set system hostname
  set-icon-name NAME   Set icon name for host
  set-chassis NAME     Set chassis type for host
  set-deployment NAME  Set deployment environment for host
  set-location NAME    Set location for host
==DNS==
![[/Untitled 9 8.png|Untitled 9 8.png]]
If name resolution cannot be done locally using the **/etc/hosts** file, then the system will query a DNS (Domain Name Server) server.
DNS is dynamic and consists of a network of servers which a client uses to look up names. The service is distributed; any one DNS server has only information about its zone of authority; however, all of them together can cooperate to resolve any name.
The machine’s usage of DNS is configured in the **/etc/resolv.conf** file, which historically has looked like:
search example.com aps.org
nameserver 192.168.1.1
nameserver 8.8.8.8
which:
- Can specify particular domains to search.
- Defines a strict order of nameservers to query.
- May be manually configured or updated from a service such as DHCP (Dynamic Host Configuration Protocol).
Most modern systems will have an **/etc/resolv.conf** file generated automatically, such as:
# Generated by NetworkManager
192.168.1.1
which was generated by Network Manager invoking DHCP on the primary network interface.
Networking Problem Troubleshooting
Network problems can be caused either by software or hardware, and can be as simple as is the device driver loaded, or is the network cable connected. If the network is up and running but performance is terrible, it really falls under the banner of performance tuning, not troubleshooting. The problems may be external to the machine, or require adjustment of the various networking parameters, including buffer sizes, etc.
The following items need to be checked when there are issues with networking:
- ==IP configuration== : Use
**ifconfig**or**ip**to see if the interface is up, and if so, if it is configured - ==Network Driver== : If the interface cannot be brought up, maybe the correct device driver for the network card(s) is not loaded. Check with
**lsmod**if the network driver is loaded as a kernel module, or by examining relevant pseudofiles in**/proc**and**/sys**, such as**/proc/interrupts**or**/sys/class/net**. - ==Connectivity== : Use
**ping**to see if the network is visible, checking for response time and packet loss.**traceroute**can follow packets through the network, while**mtr**can do this in a continuous fashion. Use of these utilities can tell you if the problem is local or on the Internet. - ==Default gateway and routing configuration== : Run
**route -n**and see if the routing table make sense - ==Hostname resolution== : Run
**dig**or**host**on a URL and see if DNS is working properly.
Networking Configuration and Tools
==Network Configuration Files==
- Network configuration files are essential to ensure that interfaces function correctly. They are located in the
**/etc**directory tree.
==Network Interfaces==
- Network interfaces are a connection channel between a device and a network.
- Physically, network interfaces can proceed through a network interface card (NIC), or can be more abstractly implemented as software.
- You can have multiple network interfaces operating at once. Specific interfaces can be brought up (activated) or brought down (de-activated) at any time.
- Information about a particular network interface or all network interfaces can be reported by the
**ip**and**ifconfig**utilities, which you may have to run as the superuser, or at least, give the full path, i.e. /sbin/ifconfig, on some distributions. **ip**is newer than**ifconfig**and has far more capabilities, but its output is uglier to the human eye.
==The== ==**ip**== ==Utility==
-
To view the IP address:
**$ /sbin/ip addr show** -
To view the routing information:
**$ /sbin/ip route show** -
**ip**is a very powerful program that can do many things. -
Older (and more specific) utilities such as
**ifconfig**and**route**are often used to accomplish similar tasks.
==**ping**==
**ping**is used to check whether or not a machine attached to the network can receive and send data; i.e. it confirms that the remote host is online and is responding.- To check the status of the remote host, at the command prompt, type
**ping <hostname>**. **ping**is frequently used for network testing and management; however, its usage can increase network load unacceptably. Abort the execution of**ping**by typing**CTRL-C**, or by using the**-c**option, which limits the number of packets that**ping**will send before it quits. When execution stops, a summary is displayed.
==**route**==
- A network requires the connection of many nodes.
- Data moves from source to destination by passing through a series of routers and potentially across multiple networks.
- Servers maintain routing tables containing the addresses of each node in the network.
- The IP routing protocols enable routers to build up a forwarding table that correlates final destinations with the next hop addresses.
- use the
**route**utility or the newer**ip route**command to view or change the IP routing table to add, delete, or modify specific (static) routes to specific hosts or networks.
| ==Task== | ==Command== |
| Show current routing table | **$ route –n** or $ ip route |
| Add static route | $ route add -net address or $ ip route add |
| Delete static route | $ route del -net address or **$ ip route del** |
==**mtr**==
Combines the functionality of **ping** and **traceroute** and creates a continuously updated display, like **top**.
==**traceroute**==
**traceroute**is used to inspect the route which the data packet takes to reach the destination host, which makes it quite useful for troubleshooting network delays and errors.- By using
**traceroute**, you can isolate connectivity issues between hops, which helps resolve them faster. - To print the route taken by the packet to reach the network host, at the command prompt, type
**traceroute <address>**.
==More Networking Tools==
| ==Networking Tools== | ==Description== |
**ethtool** |
Queries network interfaces and can also set various parameters such as the speed |
**netstat** |
Displays all active connections and routing tables; useful for monitoring performance and troubleshooting |
**nmap** |
Scans open ports on a network; important for security analysis |
**tcpdump** |
Dumps network traffic for analysis |
**iptraf** |
Monitors network traffic in text mode |
**mtr** |
Combines functionality of ping and traceroute and gives a continuously updated display |
**dig** |
Tests DNS workings; a good replacement for host and nslookup |
==Network Time Protocol==
Many protocols require consistent, if not accurate time to function properly.
The security of many encryption systems is highly dependent on proper time. Industries such as commodities or stock trading require highly accurate time, as a difference of only seconds can mean hundreds, if not thousands of dollars.
The Network Time Protocol (NTP) is a method to update and synchronize system time. NTP consists of a daemon and a protocol. NTP time sources are divided up into ”strata”:
- A strata 0 clock is a special purpose time device (Atomic clock, GPS radio, etc.)
- A strata 1 server is any NTP server connected directly to a strata 0 source (over serial or the like)
- A strata 2 server is any NTP server which references a strata 1 server using NTP
- A strata 3 server is any NTP server which references a strata 2 server using NTP
NTP may function as a client, server, or a peer.
- client - acquires time from a server or a peer
- server - provides time to a client
- peers - synchronize time between other peers regardless of the defined servers
![[/Untitled 10 8.png|Untitled 10 8.png]]
==NTP Applications==
There are several NTP applications; some of the most common are:
[**ntp**](http://www.ntp.org/)- the default[**chrony**](http://chrony.tuxfamily.org/)- designed to work in a wide range of environments, including intermittent network connections and virtual machines**systemd-timesyncd**- an ntp client only included in the systemd package
Implementation of NTP services varies widely between distributions. The most common elements of the configuration are similar for most popular time synchronization applications. Here are the common locations for the ntp applications configuration files:
- ntp -
**/etc/ntp.conf** - chrony -
**/etc/chrony.conf** - systemd-timesyncd -
**/etc/systemd/timesyncd.conf**
The various ntp applications may conflict with each other, so only have one ntp application active at a time.
==Configuring the== ==**ntpd**== ==Client==
A good NTP server is only as good as its time source. The NTP Pool Project was created to alleviate the load that was crippling the small number of NTP servers.
The pool directive is aware of round-robin DNS servers and allows a different IP address on each request.
If the connection allows peers, the pool command will establish peers on its own.
The classic server directive may be used if desired.
To configure your NTP server to use NTP Pool, edit **/etc/ntp.conf** and add or edit the following settings:
vi /etc/ntp.conf

driftfile /var/lib/ntp/ntp.drift
pool 0.pool.ntp.org
pool 1.pool.ntp.org
pool 2.pool.ntp.org
pool 3.pool.ntp.org
The **ntpdc -c peers** command can show the time differential between the local system and configured time servers.
- The
**timedatectl**command is in many distributions and may be used to query and control the system time and date. **timedatectl**is part of thesystemdlandscape and supports additional options when used with**systemd-timesyncd**.
timedatectl
               Local time: Sun 2023-03-05 16:13:50 UTC
           Universal time: Sun 2023-03-05 16:13:50 UTC
                 RTC time: Sun 2023-03-05 16:13:50
                Time zone: Etc/UTC (UTC, +0000)
System clock synchronized: yes
              NTP service: active
RTC in local TZ: no==Configuring the== ==**ntpd**== ==Server==
The configuration elements for the ntp server are contained in the **/etc/ntp.conf** file. Here are some of the ntp server relevant items:
- Declare the local machine to be a time reference
- The server and fudge directives
- Regulate who can query the time server with
**ntpq**and**ntpdc**commands (see CVE-2013-5211)- The restrict directives
- Declare which systems are
ntppeers- The peers are listed in the
**/etc/ntp.conf**file
- The peers are listed in the
- Start NTP daemon
==Access Control==
Here is an example of access control entries in **/etc/ntp.conf**.
/etc/ntp.conf: access control
# Default policy prevents queries
restrict default nopeer nomodify notrap noquery
# Allow queries from a particular subnet
restrict 123.123.x.0 mask 255.255.255.0 nopeer nomodify notrap
# Allow queries from a particular host
restrict 131.243.1.42 nopeer nomodify notrap noquery
# Unrestrict localhost
restrict 127.0.0.1==Peer Configuration==
Here is an example of ntp peer configuration entries.
/etc/ntp.conf: peer configuration
peer 128.100.49.12
peer 192.168.0.1==Declaring Self a Time Source==
This is an example of the ntp declaring itself as an NTP server. The second line, the fudge entry, specifies this server is a stratum 10 server.
/etc/ntp.conf: declare self a time source
server 127.127.1.0
fudge 127.127.1.0 stratum 10
Browsers, wget and curl
==**wget**==
**wget**is a command line utility that can capably handle the following types of downloads:- Large file downloads
- Recursive downloads, where a web page refers to other web pages and all are downloaded at once
- Password-required downloads
- Multiple file downloads.
- To download a web page, you can simply type
**wget <url>**, and then you can read the downloaded page as a local file using a graphical or non-graphical browser.
==**curl**==
- Besides downloading, you may want to obtain information about a URL, such as the source code being used.
**curl**can be used from the command line or a script to read such information.**curl**also allows you to save the contents of a web page to a file, as does**wget**.- You can read a URL using
**curl <URL>**.- For example, if you want to read http://www.linuxfoundation.org, type
**curl http://www.linuxfoundation.org**.
- For example, if you want to read http://www.linuxfoundation.org, type
- To get the contents of a web page and store it to a file, type
**curl -o saved.html http://www.mysite.com**. The contents of the main index file at the website will be saved in saved.html.
Transferring Files
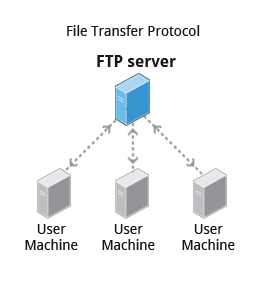
==FTP (File Transfer Protocol)==
- When you are connected to a network, you may need to transfer files from one machine to another. File Transfer Protocol (FTP) is a well-known and popular method for transferring files between computers using the Internet. This method is built on a client-server model.
- FTP can be used within a browser or with stand-alone client programs.
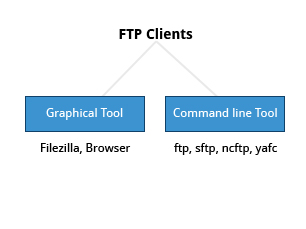
==FTP Clients==
- FTP clients enable you to transfer files with remote computers using the FTP protocol. These clients can be either graphical or command line tools.
- Filezilla, for example, allows use of the drag-and-drop approach to transfer files between hosts. All web browsers support FTP, all you have to do is give a URL like ftp://ftp.kernel.org where the usual http:// becomes ftp://.
- ftp has become primitive and is insecure, as an alternative, sftp is a very secure mode of connection, which uses the Secure Shell (ssh) protocol.
- sftp encrypts its data and thus sensitive information is transmitted more securely. However, it does not work with so-called anonymous FTP (guest user credentials).
==SSH: Executing Commands Remotely==
- Secure Shell (SSH) is a cryptographic network protocol used for secure data communication.
- It is also used for remote services and other secure services between two devices on the network and is very useful for administering systems which are not easily available to physically work on, but to which you have remote access.
- To login to a remote system using your same user name you can just type ssh some_system
and press Enter. - ssh then prompts you for the remote password. You can also configure ssh to securely allow your remote access without typing a password each time.
- If you want to run as another user, you can do either ssh -l someone some_system
or ssh someone@some_system.
==Copying Files Securely with== ==**scp**==
-
We can also move files securely using Secure Copy (
**scp**) between two networked hosts. scp uses the SSH protocol for transferring data. -
To copy a local file to a remote system, at the command prompt, type
**scp <localfile> <user@remotesystem>:/home/user/**and press Enter. -
You will receive a prompt for the remote password. You can also configure scp so that it does not prompt for a password for each transfer.
![[/Untitled 11 8.png|Untitled 11 8.png]]

-
Lab 14.1: Network Troubleshooting
Troubleshooting network problems is something that you will often encounter if you haven’t already. We are going to practice some of the previously discussed tools, that can help you isolate, troubleshoot and fix problems in your network.
-
Solution
1. Suppose you need to perform an Internet search, but your web browser can not find google.com, saying the host is unknown. Let's proceed step by step to fix this. First make certain your network is properly configured. If your Ethernet device is up and running, running `**ifconfig**` should display something like: ```TypeScript student:/tmp> /sbin/ifconfig eno167777 Link encap:Ethernet HWaddr 00:0C:29:BB:92:C2 inet addr:192.168.1.14 Bcast:192.168.1.255 Mask:255.255.255.0 inet6 addr: fe80::20c:29ff:febb:92c2/64 Scope:Link UP BROADCAST RUNNING MULTICAST MTU:1500 Metric:1 RX packets:3244 errors:0 dropped:0 overruns:0 frame:0 TX packets:2006 errors:0 dropped:0 overruns:0 carrier:0 collisions:0 txqueuelen:1000 RX bytes:4343606 (4.1 Mb) TX bytes:169082 (165.1 Kb) lo Link encap:Local Loopback inet addr:127.0.0.1 Mask:255.0.0.0 inet6 addr: ::1/128 Scope:Host UP LOOPBACK RUNNING MTU:65536 Metric:1 RX packets:0 errors:0 dropped:0 overruns:0 frame:0 TX packets:0 errors:0 dropped:0 overruns:0 carrier:0 collisions:0 txqueuelen:0 RX bytes:0 (0.0 b) TX bytes:0 (0.0 b) On older systems you probably will see a less cryptic name than eno167777, like eth0, or for a wireless connection, you might see something like wlan0 or wlp3s0. You can also show your IP address with: student:/tmp> ip addr show 1: lo: mtu 65536 qdisc noqueue state UNKNOWN group default link/loopback 00:00:00:00:00:00 brd 00:00:00:00:00:00 inet 127.0.0.1/8 scope host lo valid_lft forever preferred_lft forever inet6 ::1/128 scope host valid_lft forever preferred_lft forever 2: eno16777736: mtu 1500 qdisc pfifo_fast state \ UP group default qlen 1000 link/ether 00:0c:29:bb:92:c2 brd ff:ff:ff:ff:ff:ff p inet 192.168.1.14/24 brd 192.168.1.255 scope global dynamic eno16777736 valid_lft 84941sec preferred_lft 84941sec inet 192.168.1.15/24 brd 192.168.1.255 scope global secondary dynamic eno16777736 valid_lft 85909sec preferred_lft 85909sec inet6 fe80::20c:29ff:febb:92c2/64 scope link valid_lft forever preferred_lft forever ``` Does the IP address look valid? Depending on where you are using this from, it is most likely a Class C IP address; in the above this is 192.168.1.14 If it does not show a device with an IP address, you may need to start or restart the network and/or NetworkManager. For most distributions **one of these** commands will accomplish this: ```Bash student:/tmp> sudo systemctl restart NetworkManager student:/tmp> sudo systemctl restart network student:/tmp> sudo service NetworkManager restart student:/tmp> sudo service network restart ``` If your device was up but had no IP address, the above should have helped fix it, but you can try to get a fresh address with: ```Bash student:/tmp> sudo dhclient eth0 ``` substituting the right name for the Ethernet device. 1. If your interface is up and running with an assigned IP address and you still can not reach google.com, we should make sure you have a valid hostname assigned to your machine, with hostname: ```Bash student:/tmp> hostname openSUSE ``` It is rare you would have a problem here, as there is probably always at least a default hostname, such as localhost. 1. When you type in a name of a site such as google.com, that name needs to be connected to a known IP address. This is usually done employing the DNS sever (Domain Name System) First, see if the site is up and reachable with ping: ```Bash student:/tmp> sudo ping -c 3 google.com PING google.com (216.58.216.238) 56(84) bytes of data. 64 bytes from ord31s22-in-f14.1e100.net (216.58.216.238): icmp_seq=1 ttl=51 time=21.7 ms 64 bytes from ord31s22-in-f14.1e100.net (216.58.216.238): icmp_seq=2 ttl=51 time=23.8 ms 64 bytes from ord31s22-in-f14.1e100.net (216.58.216.238): icmp_seq=3 ttl=51 time=21.3 ms --- google.com ping statistics --- 3 packets transmitted, 3 received, 0% packet loss, time 2002ms rtt min/avg/max/mdev = 21.388/22.331/23.813/1.074 ms ``` Note: We have used sudo for ping; recent Linux distributions have required this to avoid clueless or malicious users from flooding systems with such queries. We have used **-c 3 to limit to 3 packets**; otherwise ping would run forever until forcibly terminated, say with CTRL-C. If the result was: `ping: unknown host google.com` It is likely that something is wrong with your DNS set-up. (Note on some systems you will never see the unknown host message, but you will get a suspicious result like: ```Bash student:/tmp> sudo ping l89xl28vkjs.com PING l89xl28vkjs.com.site (127.0.53.53) 56(84) bytes of data. 64 bytes from 127.0.53.53: icmp_seq=1 ttl=64 time=0.016 ms ... ``` where the 127.0.x.x address is a loop feeding back to the host machine you are on. You can eliminate this as being a valid address by doing: ```Bash student:/tmp> host l89xl28vkjs.com Host l89xl28vkjs.com not found: 3(NXDOMAIN) ``` whereas a correct result would look like: ```Bash student:/tmp> host google.com google.com has address 216.58.216.206 google.com has IPv6 address 2607:f8b0:4009:80b::200e google.com mail is handled by 20 alt1.aspmx.l.google.com. google.com mail is handled by 10 aspmx.l.google.com. google.com mail is handled by 30 alt2.aspmx.l.google.com. google.com mail is handled by 40 alt3.aspmx.l.google.com. google.com mail is handled by 50 alt4.aspmx.l.google.com. ``` The above command utilizes the DNS server configured in /etc/resolv.conf on your machine. If you wanted to override that you could do: ```Bash host 8.8.8.8 8.8.8.8.in-addr.arpa domain name pointer google-public-dns-a.google.com. student@linux:~> host google.com 8.8.8.8 Using domain server: Name: 8.8.8.8 Address: 8.8.8.8\#53 Aliases: google.com has address 216.58.216.110 google.com has IPv6 address 2607:f8b0:4009:804::1002 ...\ ``` where we have used the publicly available DNS server provided by Google itself. (Using this or another public server can be a good trick sometimes if your network is up but DNS is ill; in that case you can also enter it in `resolv.conf`.) Note that there is another file, `/etc/hosts`, where you can associate names with IP addresses, which is used before the DNS server is consulted. This is most useful for specifying nodes on your local network. You could also use the dig utility if you prefer: ```Bash student:/tmp> dig google.com ; <<>> DiG 9.9.5-rpz2+rl.14038.05-P1 <<>> google.com ;; global options: +cmd ;; Got answer: ;; ->>HEADER<<- opcode: QUERY, status: NOERROR, id: 29613 ;; flags: qr rd ra; QUERY: 1, ANSWER: 11, AUTHORITY: 0, ADDITIONAL: 1 ;; OPT PSEUDOSECTION: ; EDNS: version: 0, flags:; MBZ: 1c20 , udp: 1280 ;; QUESTION SECTION: ;google.com. IN A ;; ANSWER SECTION: google.com. 244 IN A 173.194.46.67 google.com. 244 IN A 173.194.46.65 google.com. 244 IN A 173.194.46.71 google.com. 244 IN A 173.194.46.73 google.com. 244 IN A 173.194.46.69 google.com. 244 IN A 173.194.46.68 google.com. 244 IN A 173.194.46.64 google.com. 244 IN A 173.194.46.72 google.com. 244 IN A 173.194.46.70 google.com. 244 IN A 173.194.46.66 google.com. 244 IN A 173.194.46.78 ;; Query time: 22 msec ;; SERVER: 192.168.1.1\#53(192.168.1.1) ;; WHEN: Mon Apr 20 08:58:58 CDT 2015 ;; MSG SIZE rcvd: 215 ``` 1. Suppose host or dig fail to connect the name to an IP address. There are many reasons DNS can fail, some of which are:-
The DNS server is down. In this case try pinging it to see if it is alive (you should have the IP address in /etc/resolv.conf.
-
The server can be up and running, but DNS may not be currently available on the machine.
-
Your route to the DNS server may not be correct.
How can we test the route? Tracing the route to one of the public name server we mentioned before:student@linux:~> sudo traceroute 8.8.8.8 traceroute to 8.8.8.8 (8.8.8.8), 30 hops max, 60 byte packets 1 192.168.1.1 (192.168.1.1) 0.405 ms 0.494 ms 0.556 ms 2 10.132.4.1 (10.132.4.1) 15.127 ms 15.107 ms 15.185 ms 3 dtr02ftbgwi-tge-0-6-0-3.ftbg.wi.charter.com (96.34.24.122) 15.243 ms 15.327 ms 17.878 ms 4 crr02ftbgwi-bue-3.ftbg.wi.charter.com (96.34.18.116) 17.667 ms 17.734 ms 20.016 ms 5 crr01ftbgwi-bue-4.ftbg.wi.charter.com (96.34.18.108) 22.017 ms 22.359 ms 22.052 ms 6 crr01euclwi-bue-1.eucl.wi.charter.com (96.34.16.77) 29.430 ms 22.705 ms 22.076 ms 7 bbr01euclwi-bue-4.eucl.wi.charter.com (96.34.2.4) 17.795 ms 25.542 ms 25.600 ms 8 bbr02euclwi-bue-5.eucl.wi.charter.com (96.34.0.7) 28.227 ms 28.270 ms 28.303 ms 9 bbr01chcgil-bue-1.chcg.il.charter.com (96.34.0.9) 33.114 ms 33.072 ms 33.175 ms 10 prr01chcgil-bue-2.chcg.il.charter.com (96.34.3.9) 36.882 ms 36.794 ms 36.895 ms 11 96-34-152-30.static.unas.mo.charter.com (96.34.152.30) 42.585 ms 42.326 ms 42.401 ms 12 216.239.43.111 (216.239.43.111) 28.737 ms 216.239.43.113 (216.239.43.113) 24.558 ms 23.941 ms 13 209.85.243.115 (209.85.243.115) 24.269 ms 209.85.247.17 (209.85.247.17) 25.758 ms 216.239.50.123 (216.239.50.123) 25.433 ms 14 google-public-dns-a.google.com (8.8.8.8) 25.239 ms 24.003 ms 23.795 msAgain, this should likely work for you, but what if you only got the first line in the traceroute output?
If this happened, most likely your default route is wrong. Try:
student:/tmp> ip route show

    efault via 192.168.1.1 dev eno16777736  proto static  metric 1024
    192.168.1.0/24 dev eno16777736  proto kernel  scope link  src 192.168.1.14
Most likely this is set to your network interface and the IP address of your router, DSL, or Cable Modem. Let’s say that it is blank or simply points to your own machine. Here’s your problem! At this point, you would need to add a proper default route and run some of the same tests we just did.
Note, an enhanced version of traceroute is supplied by mtr, which runs continuously (like top). Running it with the –report-cycles option to limit how long it runs:
 student:/tmp> sudo mtr --report-cycles 3 8.8.8.8

                                 My traceroute  [v0.85]
    c7 (0.0.0.0)                                           Mon Apr 20 09:30:41 2015
    Unable to allocate IPv6 socket for nameserver communication: Address family not supported
                  by protocol                  Packets               Pings
     Host                                Loss%   Snt   Last   Avg  Best  Wrst StDev
                                          0.0%     3    0.3   0.3   0.2   0.3   0.0
     2. 10.132.4.1                        0.0%     3    6.3   7.1   6.3   8.4   0.7
     3. dtr02ftbgwi-tge-0-6-0-3.ftbg.wi.  0.0%     3    6.2   7.5   6.2  10.0   2.1
     4. dtr01ftbgwi-bue-1.ftbg.wi.charte  0.0%     3    8.9   8.5   6.2  10.4   2.0
     5. crr01ftbgwi-bue-4.ftbg.wi.charte  0.0%     3    8.9   9.7   8.9  10.4   0.0
     6. crr01euclwi-bue-1.eucl.wi.charte  0.0%     3   16.5  17.4  14.2  21.5   3.7
     7. bbr01euclwi-bue-4.eucl.wi.charte  0.0%     3   23.5  22.0  18.2  24.2   3.2
     8. bbr02euclwi-bue-5.eucl.wi.charte  0.0%     3   18.9  22.7  18.1  31.1   7.2
     9. bbr01chcgil-bue-1.chcg.il.charte  0.0%     3   22.9  23.0  22.9  23.1   0.0
    10. prr01chcgil-bue-2.chcg.il.charte  0.0%     3   21.4  24.1  20.8  30.2   5.2
    11. 96-34-152-30.static.unas.mo.char  0.0%     3   22.6  21.9  20.0  23.3   1.6
    12. 216.239.43.111                    0.0%     3   21.2  21.7  21.2  22.0   0.0
    13. 72.14.237.35                      0.0%     3   21.2  21.0  19.8  21.9   1.0
    14. google-public-dns-a.google.com    0.0%     3   26.7  23.0  21.0  26.7   3.2
-
-
==SSH==
-
To securely access a remote system, you may need to log in or run commands using the same or different username.
-
You may also need to transfer files using
scp, all while ensuring secure and interception-free communication. -
SSH (Secure SHell) exists for this purpose. It uses encryption based on strong algorithms.
-
Assuming the proper SSH packages are installed on a system, no further setup is needed to begin using SSH. To sign onto a remote system, use the following command:
ssh farflung.com
[email protected]'s password: (type here)
assuming there is a student account on farflung.com. To log in as a different user, you can use:
ssh [email protected] ssh -l root farflung.com -
To copy files from one system to another, you can do the following:
scp file.txt farflung.com:/tmp scp file.tex [email protected]/home/student scp -r some_dir farflung.com:/tmp/some_dir -
To run a command on multiple systems simultaneously, you can use the following command:
for machines in node1 node2 node3 do (ssh $machines some_command &) done -
You can use the
**pssh**(Parallel SSH) utility to execute a command on multiple systems in one fell stroke as in:pssh -viH machine1 machine2 machine3 do_something
==ssh Configuration Files==
One can configure SSH further to expedite its use, in particular to permit logging in without a password. User-specific configuration files are created under every user’s home directory in the hidden **.ssh** directory:
-
**id_rsa/span>**: the user’s private key -
**id_rsa.pub**: the user’s public key -
**authorized_keys**: public keys that are permitted to log in -
**known_hosts**: hosts from which logins have been allowed in the past -
**config**: file for specifying various options -
First a user has to generate their private and public encryption keys with
**ssh-keygen**:ssh-keygen Generating public/private rsa key pair. ... cat authorized_keys ssh-rsa AAAAB3Nza........student@debian ssh-rsa AAAAB3Nza........student@fedora -
The private key must never ever be shared with anyone. The public key, however, should be given to any machine with which you want to permit password-less access. Note that authorized_keys contains public keys that are allowed to login as you on this machine.
-
**known_hosts**is gradually built up as ssh accesses occur. If the system detects changes in the users who are trying to log in through ssh, it will warn you of them and afford the opportunity to deny access.cat known_hosts x7 ecdsa-sha2-nistp256 AAAAE2VjZHNhLXN...... M= 192.168.1.200 ecdsa-sha2-nistp256 AAAA...... bcs=OpenSSH
==SSH Configuration File Precedence==
-
The order the configuration files are processed is as follows:
- Command line options
**~/.ssh/config****/etc/ssh/ssh_config**
-
The precedence of the files and the contents is first match used.
**/home/student/.ssh/config**Host apple HostName 192.168.0.196 User student Port 4242 IdentityFile /home/student/.ssh/custom Host aws Hostname ec2-34-238-135-25.compute-1.amazonaws.com User ubuntu IdentityFile /home/student/.ssh/cloud1.pem ForwardX11 no PasswordAuthentication no Host *In the above
~``**/.ssh/config**specific configuration information is listed for the hosts apple and aws. If neither of these match, then the generic parameters would apply. This configuration has no generic parameters. The command usage would be:ssh apple or ssh aws
==SSH on a Cloud System==
- SSH on a cloud system works the same, with some automation applied.
- The ssh keys are generated for the default user during cloud system creation
- The public key is copied into the default user’s authorized_keys file
- An option to copy the public and private to your local system is presented
- Password-based authentication is generally not supported for users on cloud systems
It is not uncommon to misplace public keys on remote systems. Recreating a public can be done with **ssh-keygen**.
Command:
$~/.ssh$ ls -l
-rw------- 1 student student 411 Jul 11 07:01 id_ed25519
-rw-r--r-- 1 student student 96 Jul 11 07:01 id_ed25519.pub

\#Rename the public key:
mv id_ed25519.pub id_ed25519.pub.lost
$~/.ssh$ ls -l
-rw------- 1 student student 411 Jul 11 07:01 id_ed25519
-rw-r--r-- 1 student student 96 Jul 11 07:01 id_ed25519.pub.lost

ssh-keygen -y -f ~/.ssh/id_ed25519 > ~/.ssh/id_ed25519.pub

$~/.ssh$ ls -l
-rw------- 1 student student 411 Jul 11 07:01 id_ed25519
-rw-rw-r-- 1 student student 96 Jul 11 07:04 id_ed25519.pub
-rw-r--r-- 1 student student 96 Jul 11 07:01 id_ed25519.pub.lostssh-keygen: This is the command itself, which is used to generate SSH keys.-y: This option is used to read a private SSH key file and output the corresponding public key. In this case, it’s used to read the private key file~/.ssh/id_ed25519.-f ~/.ssh/id_ed25519: This specifies the path to the private key file (id_ed25519) that you want to generate the corresponding public key for.> ~/.ssh/id_ed25519.pub: This redirects the output (the generated public key) to a file namedid_ed25519.pubin the~/.sshdirectory.
NETWORK DEVICES AND CONFIGURATION
Network devices such as Ethernet and wireless connections require careful configuration, especially when there are multiple devices of the same type. The question of consistent and persistent device naming can become tricky in such circumstances. Recently, the adoption of new schemes has made the naming more predictable. A number of important utilities are used to bring devices up and down, configure their properties, establish routes, etc., and system administrators must become adept at their use.
Network Devices
Unlike block and character devices, ==network devices are not associated with special device files==, also known as device nodes. Rather than having associated entries in the **/dev** directory, they are known by their names.
These names usually consist of a type identifier followed by a number, as in:
**eth0**,**eth1**,**eno1**,**eno2**, etc., for ethernet devices.**wlan0**,**wlan1**,**wlan2**,**wlp3s0**,**wlp3s2**, etc., for wireless devices.**br0**,**br1**,**br2**, etc., for bridge interfaces.**vmnet0**,**vmnet1**,**vmnet2**, etc., for virtual devices for communicating with virtual clients.- Historically, multiple virtual devices could be associated with single physical devices; these were named with colons and numbers; so,
**eth0:0**would be the first alias on the**eth0**device. This was done to support multiple IP addresses on one network card. However, with the use of**ip**instead of**ifconfig**, this method is deprecated and we will not pursue it. This is not compatible with IPv6. - The historical device naming conventions encountered difficulties, particularly when multiple interfaces of the same type were present. For example, suppose you have two network cards; one would be named
**eth0**and the other**eth1**. However, which physical device should be associated with each name? - The simplest method would be to have the first device found be
**eth0**, the second**eth1**, etc. Unfortunately, probing for devices is not deterministic for modern systems, and devices may be located or plugged in an unpredictable order. Thus, you might wind up with the Internet interface swapped with the local interface. Even if hardware does not change, the order in which interfaces are located has been known to vary with kernel version and configuration. - Many system administrators have solved this problem in a simple manner, by hard-coding associations between hardware (MAC) addresses and device names in system configuration files and startup scripts. While this method has worked for years, it requires manual tuning and had other problems, such as when MAC addresses were not fixed; this can happen in both embedded and virtualized systems.
Predictable Network Interface Device Names
The Predictable Network Interface Device Names (PNIDN) is connected to **udev** and integration with systemd. There are now 5 types of names that devices can be given:
- Incorporating Firmware or BIOS provided index numbers for onboard devices. Example:
**eno1** - Incorporating Firmware or BIOS provided PCI Express hotplug slot index numbers. Example:
**ens1** - Incorporating physical and/or geographical location of the hardware connection. Example:
**enp2s0** - Incorporating the MAC address. Example:
**enx7837d1ea46da** - Using the old classic method. Example:
**eth0**
For example, on a machine with two onboard PCI network interfaces that would have been **eth0** and **eth1** (commands and outputs below):
ip link show | grep enp
2: enp4s2: <NO-CARRIER,BROADCAST,MULTICAST,UP> mtu 1500 qdisc pfifo_fast state DOWN mode DEFAULT qlen 1000
3: enp2s0: <BROADCAST,MULTICAST,UP,LOWER_UP> mtu 1500 qdisc pfifo_fast state UP mode DEFAULT qlen 1000

ifconfig | grep enp
enp2s0: flags=4163<UP,BROADCAST,RUNNING,MULTICAST> mtu 1500
enp4s2: flags=4099<UP,BROADCAST,MULTICAST mtu> 1500

\#These names are correlated with the physical locations of the hardware on the PCI system (command and output below):
lspci | grep Ethernet
02:00.0 Ethernet controller: Marvell Technology Group Ltd. 88E8056 PCI-E Gigabit Ethernet Controller (rev 12)
04:02.0 Ethernet controller: Marvell Technology Group Ltd. 88E8001 Gigabit Ethernet Controller (rev 14)

\#The triplet of numbers at the beginning of each line from the lspci output is the bus, device (or slot), and function of the device; hence it reveals the physical location.

\#Likewise, for a wireless device that previously would have been simply named wlan0 (commands and outputs below):
ip link show | grep wl
3: wlp3s0: <BROADCAST,MULTICAST,UP,LOWER_UP> mtu 1500 qdisc mq state UP mode DORMANT qlen 1000

lspci | grep Centrino
03:00.0 Network controller: Intel Corporation Centrino Advanced-N 6205 [Taylor Peak] (rev 34)
Network Configuration Files
Each distribution has its own set of files and/or directories, and they may be slightly different, depending on your distribution version.
\#Red Hat
/etc/sysconfig/network
/etc/sysconfig/network-scripts/ifcfg-ethX
/etc/sysconfig/network-scripts/ifcfg-ethX:Y
/etc/sysconfig/network-scripts/route-ethX

\#Debian
/etc/network/interfaces

\#SUSE
/etc/sysconfig/network
Network Manager Configuration Files
Network Manager can use the traditional network files from several distributions. The networking profiles are supported by plugins. The key-value is the preferred file format.
There are several optional plugins for traditional configuration compatibility:
**ifupdown**for**/etc/network/interfaces****ifcfg-rh**for**/etc/sysconfig/network-scripts****ifcfg-suse**is for simple compatibility for SUSE and openSUSE**key-file**is a generic replacement for system specific configuration files
There is a configuration option in **/etc/NetworkManager/NetworkManager.conf** in the [main] section that lists which plugins for configuration processing are to be used in a comma-separated list. For more details, see the NetworkManager.conf documentation.
Network Manager
- Once upon a time, network connections were almost all wired (Ethernet) and did not change unless there was a significant change to the system.
- As a system was booted, it consulted the network configuration files in the
**/etc**directory subtree in order to establish the interface properties such as static or dynamic (DCHP) address configuration, whether the device should be started at boot, etc. - If there were multiple network devices, policies had to be established as to what order they would be brought up, which networks they would connect to, what they would be called, etc.
As wireless connections became more common (as well as hotplug network devices such as on USB adapters), configuration became much more complicated, both because of the transient nature of the hardware and that of the specific networks being connected to.
However, modern systems often have dynamic configurations:
- Networks may change as a device is moved from place to place
- Wireless devices may have a large choice of networks to hook into
- Devices may change as hardware, such as wireless devices, are plugged in or turned on and off
The previously discussed configuration files were created to deal with more static situations and are very distribution-dependent. A step away from distribution-dependent interfaces and configuration files was a big advance.
While Network Manager still uses configuration files, it is usually best to rely on its various utilities for manipulating and updating them. Network Manager should be almost the same on different systems.
Network Manager Interfaces
Graphical Interface: If you are using your laptop we use whatever graphical interface Linux distribution’s desktop offers. Every Linux desktop (GNOME, KDE, XFCE, etc.) has one, usually reached by clicking on something in the horizontal panel. You can use this to select between different networks, configure security and passwords, turn devices off and on, etc.
**nmtui** and **ncurses** : If you are making a configuration change on your system that is likely to last for a while, you are likely to use **nmtui** (network manager text user interface), as it has almost no learning curve and will edit the underlying configuration files for you. It uses the **ncurses** library interface.
nmcli : If you need to run scripts that change the network configuration, you will want to use **nmcli** (network manager command line interface). Or, if you are a command line junkie, you may want to use this instead of **nmtui**.
**nmtui**
**nmtui** is rather straightforward to use. You can navigate with either the arrow keys or the tab key.
The nmtui menu for wireless networks should look similar to the GUI interface. Sometimes it’s useful to use this interface to view configurations for other wireless networks while configuring a new one.
![[/Untitled 12 8.png|Untitled 12 8.png]]
![[/Untitled 13 8.png|Untitled 13 8.png]]
![[/Untitled 14 8.png|Untitled 14 8.png]]
Besides activating or editing connections, you also set the system hostname. However, some operations, such as this, cannot be done by normal users and you will be prompted for the root password to go forward.
**nmcli**
**nmcli** is the command line interface to Network Manager. You can issue direct commands, but it also has an interactive mode.
Routing
Routing is the process of selecting paths in a network along which to send network traffic. The routing table is a list of routes to other networks managed by the system. It defines paths to all networks and hosts; local packets are sent directly, while remote traffic is sent to routers.
To see the current routing table, you can use either route (deprecated) or the ip command:
route -n
Kernel IP routing table
Destination     Gateway         Genmask         Flags Metric Ref    Use Iface
0.0.0.0         192.168.0.1     0.0.0.0         UG    600    0        0 wlp3s0
192.168.0.0     0.0.0.0         255.255.255.0   U     600    0        0 wlp3s0

ip route
default via 192.168.0.1 dev wlp3s0 proto dhcp src 192.168.0.101 metric 200
192.168.0.0/16 dev wlp2s0 proto kernel scope link src 192.168.0.101 metric 200
Default Route
The default route is the way packets are sent when there is no other match in the routing table for reaching the specified network.
It can be obtained dynamically using DHCP. However, it can also be manually configured (static). With the **nmcli** command it can be done via:
sudo nmcli con mod virbr0 ipv4.routes 192.168.10.0/24 +ipv4.gateway 192.168.122.0
sudo nmcli con up virbr0
or you can modify configuration files directly, thus avoiding to modify files in /etc by hand.
On Red Hat-derived systems, you can modify the **/etc/sysconfig/network** file by putting in the line:
vi /etc/sysconfig/network
GATEWAY=x.x.x.x
or alternatively in **/etc/sysconfig/network-scripts/ifcfg-ethX** on a device-specific basis in the configuration file for the individual NIC.
On either system, you can set the default gateway at runtime with these commands:
sudo ip route add default via 192.168.1.10 dev enp2s0

ip route
default via 192.168.1.10 dev enp2s0
default via 192.168.1.1 dev enp2s0 metric 1024
192.168.1.0/24 dev enp2s0 proto kernel scope link src 192.168.1.100
Note that this might wipe out your network connection! You can restore either by resetting the network, or in the above example by running this command:
sudo ip route add default via 192.168.1.1 dev enp2s0These changes are not persistent and will not survive a system restart.
Static Routes
Static routes are used to control packet flow when there is more than one router or route. They are defined for each interface and can be either persistent or non-persistent.
When the system can access more than one router, or perhaps there are multiple interfaces, it is useful to selectively control which packets go to which router.
Either the **route** or **ip** command can be used to set a non-persistent route as in:
sudo ip route add 10.5.0.0/16 via 192.168.1.100On a Red Hat-based system, a persistent route can be set by editing the **/etc/sysconfig/network-scripts/route-ethX** file as shown by the following command and its output:
cat /etc/sysconfig/network-scripts/route-eth0
10.5.0.0/16 via 172.17.9.1
Teaming and Bonding Network Interfaces
[!note]
The
ipcommand is a powerful tool for configuring network interfaces, routing, and tunnels. It replaces the olderifconfigcommand.
Teaming and Bonding interfaces allow dynamic network interface configuration to provide higher throughput and additional robustness to the network.
- ==Bonding== : Uses a kernel module to provide aggregation of network links to provide fail-over, redundancy and performance enhancements
- ==Teaming== : Is similar to bonding, except teaming uses a userspace service named teamed. The Teaming configuration method has been listed as deprecated and is scheduled to be removed in the future.
To facilitate a smooth conversion from Teaming to Bonding, the **team2bond** utility is available to convert configuration files.
Bonding Network Interfaces
There are several methods for configuring Bonding interfaces:
**sysfs**: Direct changes to the**/sys**pseudo-filesystem. Changes are not saved.**iproute2**: Supports bonding via the**ip**command; see**man 8 ip-link**for details. Changes are not saved.**Network Manager**: All Network Manager user interfaces support bonding. Changes are saved. The Network Manager configuration files can also be edited with your favorite text editor.
For more details on the **/sys** interface to bonding, check the online documentation.
Creating Bonding Network Interface with **nmcli**
Creating a configuration for a bonding interface with **nmcli** involves a few steps. Minimal steps are:
- ==Identify adapters==: Use
**nmcli device status** - ==Create bonding device==: Use
**nmcli connection add** - ==Attach interface to the bond==: Create a connection from the adapter to the bond device using
**nmcli connection add** - ==Set the bond adapter online==: Issue an
**nmcli connection up**command for the bond adapter - ==Reboot==: Although the reboot is not absolutely required, it is strongly recommended. A reboot will clean up any configuration fragments left around
For more information on **nmcli**, check the nmcli documentation.
You can see a bonding example using **nmcli** below. On the command line:
nmcli connection add type bond \
     con-name bond0 \
     ifname bond0 \
     bond.options "mode=active-backup,miimon=1000"

nmcli connection add type ethernet slave-type bond \
     con-name bond0-port1 \
     ifname enp0s20u1u1 \
     master bond0

nmcli connection add type ethernet slave-type bond \
     con-name bond0-port2 \
     ifname enp0s20u1u2 \
     master bond0

nmcli connection up bond0

nmcli device status

reboot

nmcli device status
**/etc/hosts**
The **/etc/hosts** file holds a local database of hostnames and IP addresses. It contains a set of records (each taking one line) which map IP addresses with corresponding hostnames and aliases.
A typical file looks like:
vi /etc/hosts
127.0.0.1 localhost localhost.localdomain localhost4 localhost4.localdomain4
::1 localhost localhost.localdomain localhost6 localhost6.localdomain6
192.168.1.100 hans hans7 hans64
192.168.1.150 bethe bethe7 bethe64
192.168.1.2 hp-printer
192.168.1.10 test32 test64 oldpc
Such static name resolution is primarily used for local, small, isolated networks. It is generally checked before DNS is attempted to resolve an address; however, this priority can be controlled by the **/etc/nsswitch.conf** file, but it is not often used today.
Command:
ls -l /etc/host*
-rw-r--r-- 1 root root  92 Oct 22 2015 host.conf
-rw-r--r-- 1 root root   7 Apr 21 08:46 hostname
-rw-r--r-- 1 root root 221 Apr 21 08:46 hosts
-rw-r--r-- 1 root root 411 Apr 20 17:14 hosts.allow
-rw-r--r-- 1 root root 711 Apr 20 17:14 hosts.deny
The other host-related files in **/etc** are **/etc/hosts.deny** and **/etc/hosts.allow**. These are self-documenting and their purpose is obvious from their names. The **allow** file is searched first and the **deny** file is only searched if the query is not found there.
**/etc/host.conf** contains general configuration information; it is rarely used.
==LDAP (====Lightweight Directory Access Protocol)==
LDAP (Lightweight Directory Access Protocol) is a derivative of the x.500 specification for providing directory services (think phone book) via the IP protocol.
LDAP provides database-style functionality specifically engineered to be fast, computationally lightweight, and robust.
The LDAP application protocol details transport, directory layout (organization), and methods of access to the data for operations such as read, write, delete, etc.
LDAP can provide both authentication and authorization data. However, it is primarily used for authorization alone, with Kerberos (trusted third party authentication) being a popular choice for authentication. Interestingly, Microsoft’s Active Directory service (at least for auth/auth) is little more than LDAP and Kerberos coupled together.
LDAP is used in many Single Sign On and Identity Management solutions.
==LDAP Authentication==
- LDAP (Lightweight Directory Access Protocol) is an industry standard protocol for using and administering distributed directory services over the network, and is meant to be both open and vendor-neutral.
- When using LDAP for centralized authentication, each system (or client) connects to a centralized LDAP server for user authentication. LDAP is TLS (Transport Layer Security) and SSL (Secure Sockets Layer) aware. TLS/SSL will provide a secure encrypted connection.
- The client configuration only needs to specify a minimum amount of information to connect to an LDAP server. Elements such as LDAP server IP address, search base DN (domain name), and optionally TLS are required for authentication.
- Additional user space programs are provided by the
**openldap-clients**package.
==LDAP Authentication==
LDAP Client Authentication Process
The graphic shows the information path used by LDAP/SSSD. Connecting to an LDAP server starts with PAM, the pluggable authentication module.
PAM is the default authentication mechanism for Linux; LDAP and SSSD are extension modules added to the default authentication configuration.
![[/Untitled 15 8.png|Untitled 15 8.png]]
- PAM is configured to use the pam.sss.so module
- sss.so and sssd use a combined sssd and LDAP configuration file.
vi /etc/sssd/conf.d/00-sssd.conf
[sssd]
config_file_version = 2
domains = example.com
services = nss, pam,autofs

[domain/example.com]
enumerate = true
id_provider = ldap
autofs_provider = ldap
auth_provider = ldap
chpass_provider = ldap
ldap_uri = ldap://192.168.122.154/
ldap_search_base = dc=example,dc=com
ldap_id_use_start_tls = true
cache_credentials = True
ldap_tls_reqcert =allow==LDAP and== ==**sssd**== ==packages==
When you configure a client system for LDAP authentication, the following files are changed:
**/etc/sssd/conf.d/00-sssd.conf****/etc/pam.d/common-session.conf**
The **/etc/sssd/conf.d/00-sssd.conf** file has a 2 digit prefix to allow for sequencing if more than one configuration file is being used.
The **/etc/pam.d** configuration files may be different depending on your distribution:
- CentOS 8:
**/etc/pam.d/system-auth** - Ubuntu 22.04:
**/etc/pam.d/common-session.cong**
You can edit these files manually.
In previous distribution releases, there were specific utilities used for configuration. The adoption of **sssd** (System Security Services Daemon) and friends has greatly reduced the complexity of the client configuration and eliminated the need for specialized configuration tools. Text file configuration information may be configured with your favorite text editor.
==Firewalls==
==What Is a Firewall?==
A firewall is a network security system that monitors and controls all network traffic. It applies rules on both incoming and outgoing network connections and packets and builds flexible barriers (i.e., firewalls) depending on the level of trust and network topography of a given connection.
Firewalls can be hardware or software based. They are found both in network routers, as well as in individual computers, or network nodes. Many firewalls also have routing capabilities.
- They protect against intrusions and other attack vectors
- They control the trust level on particular interfaces and/or addresses
==Packet Filtering==
Almost all firewalls are based on Packet Filtering.
Information is transmitted across networks in the form of packets, and each one of these packets has:
- Header
- Payload
- Footer
The header and footer contain information about destination and source addresses, what kind of packet it is, and which protocol it obeys, various flags, which packet number this is in a stream, and all sorts of other metadata about transmissions. The actual data is in the payload.
Packet filtering intercepts packets at one or more stages in the network transmission, including application, transport, network, and datalink.
A firewall establishes a set of rules by which each packet may be:
- Accepted or rejected based on content, address, etc.
- Mangled in some way
- Redirected to another address
- Inspected for security reasons, etc.
Various utilities exist for establishing rules and actions to be taken as the result of packet filtering.
==Firewall Generations==
- Early firewalls (dating back to the late 1980s) were based on ==packet filtering==: the content of each network packet was inspected and was either dropped, rejected, or sent on. No consideration was given about the connection state: what stream of traffic the packet was part of.
- The next generation of firewalls were based on ==stateful filters==, which also examine the connection state of the packet to see if it is a new connection, part of an already existing one, or part of none. Denial of service attacks can bombard this kind of firewall to try and overwhelm it.
- The third generation of firewalls is called ==Application Layer Firewalls==, and are aware of the kind of application and protocol the connection is using. They can block anything which should not be part of the normal flow.
==Firewall Interfaces and Tools==
Configuring your system’s firewall can be done by:
- Using relatively low-level tools from the command line, combined with editing various configuration files in the
**/etc**subdirectory tree:**iptables**,**firewall-cmd**,**ufw**, etc. - Using robust graphical interfaces:
**system-config-firewall**,**firewall-config**,**gufw**,**yast**, etc.
==**firewalld**== ==and== ==**firewall-cmd**==
firewalld is the Dynamic Firewall Manager. It utilizes network/firewall zones which have defined levels of trust for network interfaces or connections. It supports both IPv4 and IPv6 protocols.
In addition, it separates runtime and permanent (persistent) changes to configuration, and also includes interfaces for services or applications to add firewall rules.
Configuration files are kept in the **/etc/firewalld** and **/usr/lib/firewalld** directories; the files in **/etc/firewalld** override those in the other directory and are the ones a system administrator should work on.
The command line tool is actually **firewall-cmd**
==**firewalld**== ==Service Status==
firewalld is a service which needs to be running to use and configure the firewall, and is enabled/disabled, or started or stopped in the usual way (see the following commands):
sudo systemctl [enable/disable] firewalld
sudo systemctl [start/stop] firewalld

sudo systemctl status firewalld
firewalld.service - firewalld - dynamic firewall daemon
   Loaded: loaded (/usr/lib/systemd/system/firewalld.service; enabled)
   Active: active (running) since Tue 2015-04-28 12:00:59 CDT; 5min ago
 Main PID: 777 (firewalld)
...

sudo firewall-cmd --state
running

\#Note that if you have more than one network interface when using IPv4, you have to turn on ip forwarding. You can do this at runtime by running either of the following commands:

sudo sysctl net.ipv4.ip_forward=1
echo 1 > /proc/sys/net/ipv4/ip_forward

\#where the second command has to be run as root to get echo to work properly. However, this is not persistent. To do that, you have to add the following line to the /etc/sysctl.conf file:

vi /etc/sysctl.conf
net.ipv4.ip_forward=1

\#and then reboot or type this command:
sudo sysctl -p
\#to read in the new setting without rebooting.==Zones==
firewalld works with zones, each of which has a defined level of trust and a certain known behavior for incoming and outgoing packets. Each interface belongs to a particular zone (normally, it is Network Manager which informs firewalld which zone is applicable), but this can be changed with **firewall-cmd** or the **firewall-config** GUI.
Zones
-
Close drop
All incoming packets are dropped with no reply. Only outgoing connections are permitted.
-
Close block
All incoming network connections are rejected. The only permitted connections are those from within the system.
-
Close public
Do not trust any computers on the network; only certain consciously selected incoming connections are permitted.
-
Close external
Used when masquerading is being used, such as in routers. Trust levels are the same as in public.
-
Close dmz (Demilitarized Zone)
Used when access to some (but not all) services are to be allowed to the public. Only particular incoming connections are allowed.
-
Close work
Trust (but not completely) connected nodes to be not harmful. Only certain incoming connections are allowed.
-
Close home
You mostly trust the other network nodes, but still select which incoming connections are allowed.
-
Close internal
Similar to the work zone.
-
Close trusted
All network connections are allowed.
On system installation, most if not all Linux distributions will select the public zone as default for all interfaces. The differences between some of the above zones are not obvious and we do not need to go into that much detail here, but note that you should not use a more open zone than necessary.
Zone Management Examples
To see the options available for **firewall-cmd**, run this command:
\#Get the default zone (command and output below):
sudo firewall-cmd --get-default-zone
public

\#Obtain a list of zones currently being used (command and output below):
sudo firewall-cmd --get-active-zones
public
  interfaces: eno16777736

\#List all available zones (command and output below):
sudo firewall-cmd --get-zones
block dmz drop external home internal public trusted work

\#To change the default zone to trusted and then change it back (commands and outputs below):
sudo firewall-cmd --set-default-zone=trusted
success

sudo firewall-cmd --set-default-zone=public
success

\#To assign an interface temporarily to a particular zone (command and output below):
sudo firewall-cmd --zone=internal --change-interface=eno1
success

\#To assign an interface to a particular zone permanently (command and output below):
sudo firewall-cmd --permanent --zone=internal --change-interface=eno1
success

\#which creates the file /etc/firewalld/zones/internal.xml.

To ascertain the zone associated with a particular interface (command and output below):

$ sudo firewall-cmd --get-zone-of-interface=eno1
public

\#To get all details about a particular zone (command and output below):
sudo firewall-cmd --zone=public --list-all
public (active)
  target: default
  icmp-block-inversion: no
  interfaces: eno1
  sources:
  services: chromecast libvirt libvirt-tls nfs nfs3 rsyncd ssh
  ports:
  protocols:
  masquerade: no
  forward-ports:
  source-ports:
  icmp-blocks:
  rich rules:

\#Controlling firewalld is done through the firewall-cmd program. More detailed information can be obtained with:
man firewalld-cmd==Source Management==
Any zone can be bound not just to a network interface, but also to particular network addresses. A packet is associated with a zone if:
- It comes from a source address already bound to the zone; or if not,
- It comes from an interface bound to the zone.
Any packet not fitting the above criteria is assigned to the default zone (i.e, usually public).
To assign a source to a zone (permanently), run this command:
sudo firewall-cmd --permanent --zone=trusted --add-source=192.168.1.0/24
success
This says anyone with an IP address of 192.168.1.x will be added to the trusted zone.
Note that you can remove a previously assigned source from a zone by using the **--remove-source** option, or change the zone by using **--change-source**.
You can list the sources bound to a zone with the following command:
sudo firewall-cmd --permanent --zone=trusted --list-sources 192.168.1.0/24In both of the above commands, if you leave out the **--permanent** option, you get only the current runtime behavior.
==Service Management==
So far, we have assigned particular interfaces and/or addresses to zones, but we haven’t delineated what services and ports should be accessible within a zone.
To see all the services available, use this command:
sudo firewall-cmd --get-services
RH-Satellite-6 amanda-client bacula bacula-client dhcp dhcpv6 dhcpv6-client dns ftp high-availability http https imaps ipp ipp-client ipsec kerberos kpasswd ldap ldaps libvirt libvirt-tls mdns mountd ms-wbt mysql nfs ntp openvpn pmcd pmproxy pmwebapi pmwebapis pop3s postgresql proxy-dhcp radius rpc-bind samba samba-client smtp ssh telnet tftp tftp-client transmission-client vnc-server wbem-https

\#or, to see those currently accessible in a particular zone, run:
sudo firewall-cmd --list-services --zone=public
dhcpv6-client ssh

\#To add a service to a zone, type:
sudo firewall-cmd --permanent --zone=home --add-service=dhcp
success

sudo firewall-cmd --reload

\#The second command, with --reload, is needed to make the change effective. It is also possible to add new services by editing the files in /etc/firewalld/services.==Port Management==
Port management is very similar to service management (commands and outputs below):
sudo firewall-cmd --zone=home --add-port=21/tcp
success

sudo firewall-cmd --zone=home --list-ports
21/tcp

\#where by looking at /etc/services we can ascertain that port 21 corresponds to ftp (command and output below):
grep " 21/tcp" /etc/services
ftp 21/tcp==Port Redirection and NAT==
During packet ingress, sometimes it is desirable to change the destination port. When remapping ports, it is best to specify the zone and optionally an IP address to make the rule as specific as possible. This will avoid generalized rules capturing unintended packets. In the example below, the zone and port are specified.
- Inbound packet for port 80 needs to be re-directed to port 8080
- Specify the zone that is used for external connection with
**-zone=external**
Command:
sudo firewall-cmd --zone=external --add-forward-port=port=80:proto=tcp:toport=8080
success

sudo firewall-cmd --zone=external --list-all
external
  target: default
  icmp-block-inversion: no
  interfaces:
  sources:
  services: ssh
  ports:
  protocols:
  forward: yes
  masquerade: yes
  forward-ports:
        port=80:proto=tcp:toport=8080:toaddr=
  source-ports:
  icmp-blocks:
  rich rules:
Network Address Translation (NAT)
Network Address Translation (NAT) is a method the firewall uses to change the packet source or destination address as it enters or exits the firewall. There are several types of NAT:
- DNAT (Destination Network Address Translation)
- SNAT (Source Network Address Translation)
- Masquerade, a variation of SNAT
==DNAT (Destination Network Address Translation)==
DNAT (Destination Network Address Translation) alters the end destination (the “to” IP address) and possibly the destination port, as the packet enters the system from the Internet.
- When a packet is sent, it will have the public IP address provided by DNS
- The public IP address will be that of the firewall
- Changing the destination of the packet is necessary to allow the packet to move through the firewall to the internal network to the desired service
The DNAT firewall rule is normally placed in the pre-routing chain of the NAT table. This would be the Internet-facing adapter and the public address used by services like a web server.
Since firewalls are typically pass-through devices (few local services), the packet is examined and the destination port examined to see if there is an applicable rule. Our rule will examine the packet for:
- Destination IP address; it should be that of the firewall
- Destination port number; it will be the port number of the service (http=80)
- The DNAT rule will change the destination IP address to the address of the web server behind the firewall
- The packet will be forwarded to the web server behind the firewall
- The web server accepts and processes the packet and sends its reply
![[/Untitled 16 8.png|Untitled 16 8.png]]
The graphic shows a typical path a packet takes from a user system to a service on a system inside a firewall protected network.
- SystemA (IP 172.16.2.1) looks up the address for systemM (IP 10.1.2.25) for mail delivery
- The destination port number will be the port number of the service (smtp=25)
- The DNAT rule on the firewall will change the destination to the address of the mail server behind the firewall (IP 192.168.2.5)
- The packet will be forwarded to the mail server behind the firewall.
- The mail server accepts and processes the packet and sends a reply
==SNAT and Masquerade==
![[/Untitled 17 8.png|Untitled 17 8.png]]
Source Network Address Translation (SNAT) changes the source (the “from”) IP address on the packet as it leaves the system on the way to the Internet.
- Translation is required to protect the addresses used on internal networks from exposure to the Internet
- Most internal networks are private networks and not routable
If the IP address on the outbound interface is provided by DHCP, the Masquerade option is used to implement SNAT. The masquerade option requires more compute resources than SNAT.
If the outbound interface is static, SNAT can be used and the public IP address is specified.
SNAT and masquerade are in the post-routing chain of the NAT table.
The SNAT or Masquerade firewall rule is normally placed in the post-routing chain of the NAT table. Normally, post-routing is the last examination or modification point as the packet leaves the system on the way to the Internet.
- The destination address of the packet is that of the remote system that initiated the connection
- The source address of the packet will be changed from the internal address of the service to that of the firewall’s public facing adapter
==Knowledge Check (Verified Certificate track only)==
![[Screenshot_from_2022-06-29_21-33-10.png]]
![[Screenshot_from_2022-06-29_21-34-26.png]]
![[Screenshot_from_2022-06-29_21-38-18.png]]
![[Screenshot_from_2022-06-29_21-34-00.png]]
![[Screenshot_from_2022-06-29_21-37-33.png]]
Summary
- The IP (Internet Protocol) address is a unique logical network address that is assigned to a device on a network.
- IPv4 uses 32-bits for addresses and IPv6 uses 128-bits for addresses.
- Every IP address contains both a network and a host address field.
- There are five classes of network addresses available: A, B, C, D & E.
- DNS (Domain Name System) is used for converting Internet domain and host names to IP addresses.
- The ifconfig program is used to display current active network interfaces.
- The commands ip addr show and ip route show can be used to view IP address and routing information.
- You can use ping to check if the remote host is alive and responding.
- You can use the route utility program to manage IP routing.
- You can monitor and debug network problems using networking tools.
- Firefox, Google Chrome, Chromium, and Epiphany are the main graphical browsers used in Linux.
- Non-graphical or text browsers used in Linux are Lynx, Links, and w3m.
- You can use wget to download webpages.
- You can use curl to obtain information about URLs.
- FTP (File Transfer Protocol) is used to transfer files over a network.
- ftp, sftp, ncftp, and yafc are command line FTP clients used in Linux.
- You can use ssh to run commands on remote systems.